api 개발 시에 문서화를 해서 이해관계자에게 전달을 하거나 개발자들간에 공유를 하거나 한다.
이런 문서는 wiki 나 다른 기업에서는 doc이라던지 심지어 한글이라던지 문서를 만들어서 공유한다.
문서화는 개발자한테 정말 곤욕이였다. 개발하기도 바쁜데 문서까지 신경써야 하니 말이다.
혹은 개발은 해놓고 문서와의 동기화가 매번 늦거나 까먹거나 하는 경우가 빈번하게 일어난다.
그래서 문서화를 좀 더 쉽게 하기 위해 아주 오래전엔 javaDocs라고 메소드 위에다가 설명 넣고 만들어줬던 기억이 어렴풋이 난다.
내가 본 근래에는 swagger를 많이 사용하는것 같다. 그런데 이번에 새롭게 알게된 RestDocs라는것을 소개해보려고 한다.

https://techblog.woowahan.com/2597/
위에서 보는거와 같이 각자의 장단점이 있다.
Spring에서 제공해주는 녀석이다.
https://spring.io/projects/spring-restdocs

그래서 REST Docs이 뭔데?
RESTful api service의 문서화를 도와준다고 한다. 이녀석은 테스트 코드에서 Snippet(조각)을 생성하고
이 생성된 조각과 미리 만들어준 문서(index.adoc)를 조합해서 최종적인 index.html을 만들어낸다.
요 흐름은 아래에서 하나씩 알아가보자.
환경 >
현재 springboot version : 2.6.3를 사용하고 있고, java는 17을 사용하고 있다.
build로는 gradle은 아래에서 확인해보면 7.4를 사용하고 있다.

1. REST docs를 사용하기 위한 설정
1-1. build.gradle에서 test쪽에 lib를 추가해준다.
testImplementation 'org.springframework.restdocs:spring-restdocs-mockmvc'
1-2. plugin 추가
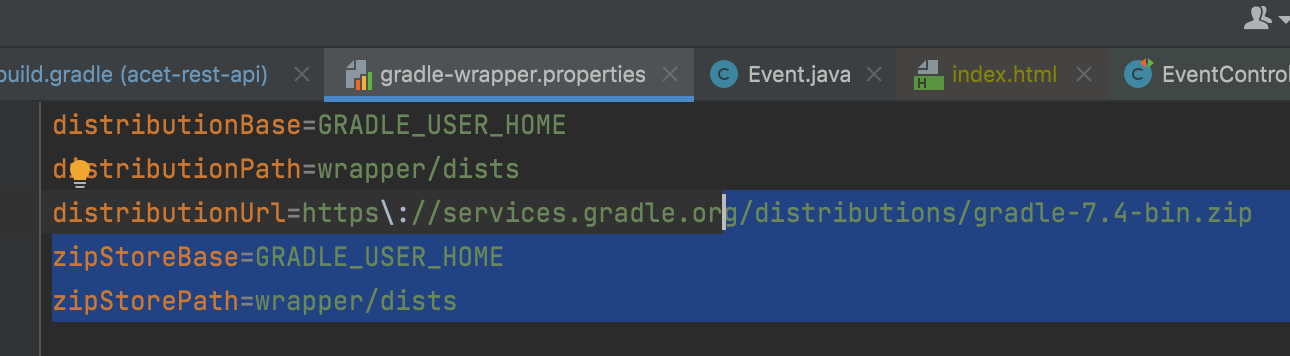
gradle 7.4를 사용하고 있는데
처음에 id 'org.asciidoctor.convert' version '1.5.8' 를 사용하고 있었다.(아마 스프링부트에서 만들어준거 같은데..)
동작을 제대로 하지 않아서 찾아봤더니..id 'org.asciidoctor.jvm.convert' version '3.3.2' 로 수정해주라고해서 했더니
잘동작 하였다. gradle 7 이상에서는 org.asciidoctor.jvm.convert 를 사용해야 한다고 한다.
https://stackoverflow.com/questions/68539790/configuring-asciidoctor-when-using-spring-restdoc
plugins {
    id 'org.springframework.boot' version '2.6.3'
    id 'io.spring.dependency-management' version '1.0.11.RELEASE'
    id 'org.asciidoctor.jvm.convert' version '3.3.2'
    id 'java'
}
그리고 아래와 같은 코드가 필요하다.
(프로젝트 생성 시에 lib를 넣었다면 알아서 코드가 들어간다.)
ext {
    set('snippetsDir', file("build/generated-snippets"))
}
생성된 Snippets의 디렉토리(저장 위치)를 명시합니다.
tasks.named('test') { // test task output 디렉토리를 snippetsDir(스니펫 저장 위치)로 지정 합니다.
    outputs.dir snippetsDir
    useJUnitPlatform()
}

tasks.named('asciidoctor') { // asciidoctor task의 input은 snippetsDir(스니펫 저장 위치) 입니다.
    inputs.dir snippetsDir
    dependsOn test
}
위에서 depensOn test라는것이 있는데 이것은 Task 'asciidoctor'는 test task 수행 후에 동작하라는 뜻이다.
( test task -> asciidoctor task)
지금까지의 설정을 하면 이제 테스트 코드에서 문서 스니펫(조각)을 만들수 있습니다.
2. 테스트 코드 작성
아래와 같이 테스트 코드에서 .andDo(document("create-event", 이 부분이 RestDoc 코드 부분이다.
자세히 보면 링크, 헤더, 필드 등 여러가지 조각들을 만들어 낸다.
class부분에는 @AutoConfigureRestDocs 를 넣어주고
@ExtendWith(SpringExtension.class)
@SpringBootTest
@AutoConfigureMockMvc
@AutoConfigureRestDocs // RestDoc 사용
@Import(RestDocsConfiguration.class) // 정렬 부분!
public class EventControllerTests {
....
....
@Test
@DisplayName("정상적으로 이벤트를 생성하는 테스트")
public void createEvent() throws Exception {
EventDto eventDto = EventDto.builder()
.name("Springboot")
.description("REST api development with springboot")
.beginEnrollmentDateTime(LocalDateTime.of(2022,02,26,17,32))
.closeEnrollmentDateTime(LocalDateTime.of(2022,02,27,17,32))
.beginEventDateTime(LocalDateTime.of(2022,02,26,17,32))
.endEventDateTime(LocalDateTime.of(2022,02,27,17,32))
.basePrice(100)
.maxPrice(200)
.limitOfEnrollment(100)
.location("제주 첨단로 카카오스페이스 닷 투")
.build();
mockMvc.perform(post("/api/events")
.contentType(MediaType.APPLICATION_JSON)
.accept(MediaTypes.HAL_JSON)
.content(objectMapper.writeValueAsString(eventDto)))
.andDo(print())
.andExpect(status().isCreated())
.andExpect(jsonPath("id").exists())
.andExpect(header().exists(HttpHeaders.LOCATION))
.andExpect(header().string(HttpHeaders.CONTENT_TYPE, MediaTypes.HAL_JSON_VALUE+";charset=UTF-8"))
.andExpect(jsonPath("free").value(false))
.andExpect(jsonPath("offline").value(true))
.andExpect(jsonPath("eventStatus").value(EventStatus.DRAFT.name()))
.andExpect(jsonPath("_links.self").exists())
.andExpect(jsonPath("_links.query-events").exists())
.andExpect(jsonPath("_links.update-event").exists())
.andDo(document("create-event",
links(
linkWithRel("self").description("link to self"),
linkWithRel("query-events").description("link to query events"),
linkWithRel("update-event").description("link to update an existing events")
),
requestHeaders(
headerWithName(HttpHeaders.ACCEPT).description("accept header"),
headerWithName(HttpHeaders.CONTENT_TYPE).description("content type header")
),
requestFields(
fieldWithPath("name").description("Name of new event"),
fieldWithPath("description").description("description of new event"),
fieldWithPath("beginEnrollmentDateTime").description("date time of beginEnrollmentDateTime"),
fieldWithPath("closeEnrollmentDateTime").description("date time of closeEnrollmentDateTime"),
fieldWithPath("beginEventDateTime").description("date time of beginEventDateTime"),
fieldWithPath("endEventDateTime").description("date time of endEventDateTime"),
fieldWithPath("location").description("location of new event"),
fieldWithPath("basePrice").description("base price of new event"),
fieldWithPath("maxPrice").description("max price of new event"),
fieldWithPath("limitOfEnrollment").description("limit of new event")
),
responseHeaders(
headerWithName(HttpHeaders.LOCATION).description("Location header"),
headerWithName(HttpHeaders.CONTENT_TYPE).description("ContentType header")
),
// relaxedResponseFields( : relaxed 접두어 - 문서 일부분만 테스트할 수 있다. 그러나 정확한 문서를 생성하지 못한다.
// 위에 이미 link를 테스트하기 때문에 오류가 나는것에 대해서는 살짝 의문
responseFields(
fieldWithPath("id").description("id of new event"),
fieldWithPath("name").description("Name of new event"),
fieldWithPath("description").description("description of new event"),
fieldWithPath("beginEnrollmentDateTime").description("date time of beginEnrollmentDateTime"),
fieldWithPath("closeEnrollmentDateTime").description("date time of closeEnrollmentDateTime"),
fieldWithPath("beginEventDateTime").description("date time of beginEventDateTime"),
fieldWithPath("endEventDateTime").description("date time of endEventDateTime"),
fieldWithPath("location").description("location of new event"),
fieldWithPath("basePrice").description("base price of new event"),
fieldWithPath("maxPrice").description("max price of new event"),
fieldWithPath("limitOfEnrollment").description("limit of new event"),
fieldWithPath("free").description("it tells if this event is free or not"),
fieldWithPath("offline").description("it tells if this event is offline event or not"),
fieldWithPath("eventStatus").description("event status"),
fieldWithPath("_links.self.href").description("link to self"),
fieldWithPath("_links.query-events.href").description("link to query event list"),
fieldWithPath("_links.update-event.href").description("link to update existing event")
)
))
;
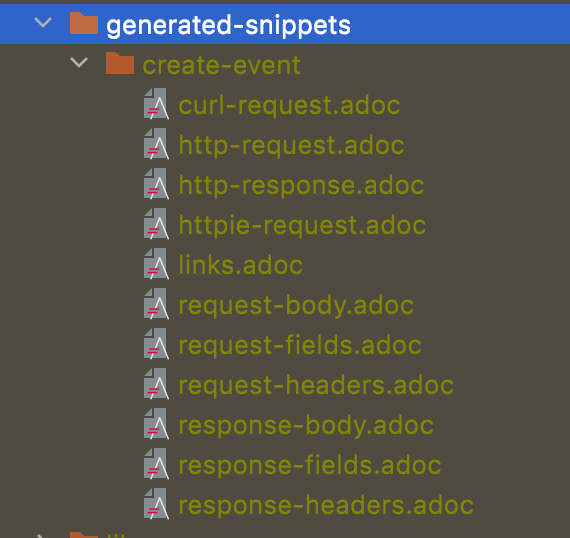
}문서조각들(Snippets)은 아래의 경로에 만들어진다.
adoc파일을 열어보면 무질서하게 나란히 코드가 나오는데 예쁘게 가지런히 나오게 하려면 아래와 같은 코드를 하나 만들어 주고
(prerryPrint()) 아래와 같이 Import 해줍니다.
@Import(RestDocsConfiguration.class)
public class EventControllerTests {
아래의 소스작성 후 TEST code쪽에 import
package kr.pe.acet.acetrestapi.events.common;

import org.springframework.boot.test.autoconfigure.restdocs.RestDocsMockMvcConfigurationCustomizer;
import org.springframework.boot.test.context.TestConfiguration;
import org.springframework.context.annotation.Bean;
import static org.springframework.restdocs.operation.preprocess.Preprocessors.prettyPrint;

@TestConfiguration
public class RestDocsConfiguration {

    @Bean
    public RestDocsMockMvcConfigurationCustomizer restDocsMockMvcConfigurationCustomizer(){
        return configurer -> configurer.operationPreprocessors()
                .withRequestDefaults(prettyPrint())
                .withResponseDefaults(prettyPrint())
                ;
    }
}
3. 템플릿 문서 만들기(경로 매우 중요! src/docs/asciidoc/이름은아무거나.adoc)
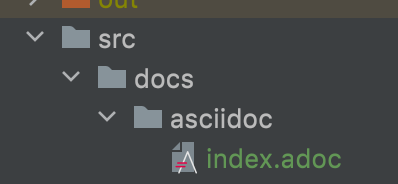
index.adoc
아래의 소스를 보면 operation::create-event[snippets='request-fields,curl-request,http-request, request-headers, http-response, response-headers, response-fields, links'] 이런식으로 조각난 스니펫들을 넣어주는 부분이 있다.
= Natural REST API Guide
박태하;
:doctype: book
:icons: font
:source-highlighter: highlightjs
:toc: left
:toclevels: 4
:sectlinks:
:operation-curl-request-title: Example request
:operation-http-response-title: Example response

[[overview]]
= 개요

[[overview-http-verbs]]
== HTTP 동사

본 REST API에서 사용하는 HTTP 동사(verbs)는 가능한한 표준 HTTP와 REST 규약을 따릅니다.

|===
| 동사 | 용례

| `GET`
| 리소스를 가져올 때 사용

| `POST`
| 새 리소스를 만들 때 사용

| `PUT`
| 기존 리소스를 수정할 때 사용

| `PATCH`
| 기존 리소스의 일부를 수정할 때 사용

| `DELETE`
| 기존 리소스를 삭제할 떄 사용
|===

[[overview-http-status-codes]]
== HTTP 상태 코드

본 REST API에서 사용하는 HTTP 상태 코드는 가능한한 표준 HTTP와 REST 규약을 따릅니다.

|===
| 상태 코드 | 용례

| `200 OK`
| 요청을 성공적으로 처리함

| `201 Created`
| 새 리소스를 성공적으로 생성함. 응답의 `Location` 헤더에 해당 리소스의 URI가 담겨있다.

| `204 No Content`
| 기존 리소스를 성공적으로 수정함.

| `400 Bad Request`
| 잘못된 요청을 보낸 경우. 응답 본문에 더 오류에 대한 정보가 담겨있다.

| `404 Not Found`
| 요청한 리소스가 없음.
|===

[[overview-errors]]
== 오류

에러 응답이 발생했을 때 (상태 코드 >= 400), 본문에 해당 문제를 기술한 JSON 객체가 담겨있다. 에러 객체는 다음의 구조를 따른다.

include::{snippets}/create-event/response-fields.adoc[]

예를 들어, 잘못된 요청으로 이벤트를 만들려고 했을 때 다음과 같은 `400 Bad Request` 응답을 받는다.

include::{snippets}/create-event/http-response.adoc[]

[[overview-hypermedia]]
== 하이퍼미디어

본 REST API는 하이퍼미디어와 사용하며 응답에 담겨있는 리소스는 다른 리소스에 대한 링크를 가지고 있다.
응답은 http://stateless.co/hal_specification.html[Hypertext Application from resource to resource. Language (HAL)] 형식을 따른다.
링크는 `_links`라는 키로 제공한다. 본 API의 사용자(클라이언트)는 URI를 직접 생성하지 않아야 하며, 리소스에서 제공하는 링크를 사용해야 한다.

[[resources]]
= 리소스

[[resources-index]]
== 인덱스

인덱스는 서비스 진입점을 제공한다.


[[resources-index-access]]
=== 인덱스 조회

`GET` 요청을 사용하여 인덱스에 접근할 수 있다.

operation::index[snippets='response-body,http-response,links']

[[resources-events]]
== 이벤트

이벤트 리소스는 이벤트를 만들거나 조회할 때 사용한다.

[[resources-events-list]]
=== 이벤트 목록 조회

`GET` 요청을 사용하여 서비스의 모든 이벤트를 조회할 수 있다.

operation::get-events[snippets='response-fields,curl-request,http-response,links']

[[resources-events-create]]
=== 이벤트 생성

`POST` 요청을 사용해서 새 이벤트를 만들 수 있다.

operation::create-event[snippets='request-fields,curl-request,http-request, request-headers, http-response, response-headers, response-fields, links']

[[resources-events-get]]
=== 이벤트 조회

`Get` 요청을 사용해서 기존 이벤트 하나를 조회할 수 있다.

operation::get-event[snippets='request-fields,curl-request,http-response,links']

[[resources-events-update]]
=== 이벤트 수정

`PUT` 요청을 사용해서 기존 이벤트를 수정할 수 있다.

operation::update-event[snippets='request-fields,curl-request,http-response,links']
참고 : 인텔리J 에서 플러그인을 깔면 아래와 같이 보입니다.

이제 조각난 문서(Snippets)들과 템플릿이 만들어졌다면 실질적으로 html형태로 최종문서가 나오게끔 설정을 해줍니다.
4. 최종문서를 만들어보자.
최종문서를 만들기 위해 설정 셋팅을 더 해줍니다. (build.gradle)
// 아래를 보면 bootJar는 asciidoctor task이후에 수행되며 수행 후 copyDocument task를 수행 합니다.
bootJar {
    dependsOn asciidoctor
    copy {
        from "${asciidoctor.outputDir}"
        into 'BOOT-INF/classes/static/docs'
    }
    finalizedBy 'copyDocument'
}

task copyDocument(type: Copy) {
    dependsOn bootJar
    from file("build/docs/asciidoc")
    into file("src/main/resources/static/docs")
}

asciidoctor.doFirst {
    delete file('src/main/resources/static/docs')
}
설정 후에 아래와 같이 gradle bootJar를 수행합니다.

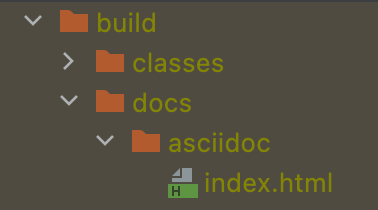
bootJar를 수행하면 src/docs/asciidoc/index.adoc 템플릿 문서와 테스트 코드에서 생성된 스니펫들이 조합된 최종 API 문서인 index.html이 아래와 같이 build/docds/asciidoc 디렉토리에 생성됩니다.
bootJar Task를 통해 index.html이 생성되면, finalizedBy에 의해 다음 Task로 copyDocument가 실행됩니다.
copyDocument가 수행되면 classpath(resources)로 API 문서가 복사됩니다.
task copyDocument(type: Copy) {
    dependsOn bootJar
    from file("build/docs/asciidoc")
    into file("src/main/resources/static/docs")
}
아래처럼 src/main/resources/static/docs 디렉토리 아래에 index.html이 생성 됩니다.
이 말은 이제 api를 동작시켜서 웹상에서 접근이 가능하다는 소리 입니다.

마지막으로 asciidoctor task를 실행하기전에 먼저 삭제를 해줍니다.
asciidoctor.doFirst {
    delete file('src/main/resources/static/docs')
}
5. 프로젝트를 동작시켜 웹에서 접근해보자.
springboot를 동작시키고 나서 아래처럼 접근 해보면 멋지구리하게 문서가 나옵니다.
http://localhost:8080/docs/index.html

'OpenSource > Spring Boot' 카테고리의 다른 글
| @Scheduled (0) | 2022.07.19 |
|---|---|
| springboot error - Could not write JSON: Can not start an array, expecting field name (context: Object) (0) | 2022.03.25 |
| HATEOAS(Hypermedia as the engine of application state) (0) | 2022.03.15 |
| springbootStudy06- lombok 을 사용해보자! (0) | 2021.11.09 |
| springbootStudy05- test code를 작성해보자 (0) | 2021.10.27 |


