용어
- 인증(Authentication)
- 해당 사용자가 본인이 맞는지 확인하는 절차
- 인가(Authorization)
- 인증된 사용자가 요청한 자원에 접근 가능한지를 결정하는 절차
- Authentication(인증) -> 인증 성공 후 -> Authorization(인가)
- Principal(접근 주체) : 보호 받는 리소스에 접근하는 대상
- Credential(비밀번호) : 리소스에 접근하는 대상의 비밀번호

Authentication
Authentication 은 현재 접근하는 주체의 정보와 권한을 담는 인터페이스입니다.
SecurityContext에 저장되며, SecurityContextHolder 를 통해 SecurityContext에 접근하고, SecurityContext 를 통해 Authentication 에 접근할 수 있습니다.
SecurityContext
Authentication을 보관하는 역할을 하며, SecurityContext를 통해 Authentication 객체를 꺼내올 수 있습니다.
SecurityContextHolder
SecurityContextHolder는 보안 주체의 세부 정보를 포함하여 응용 프로그램의 현재 보안 컨텍스트에 대한 세부 정보가 저장됩니다.
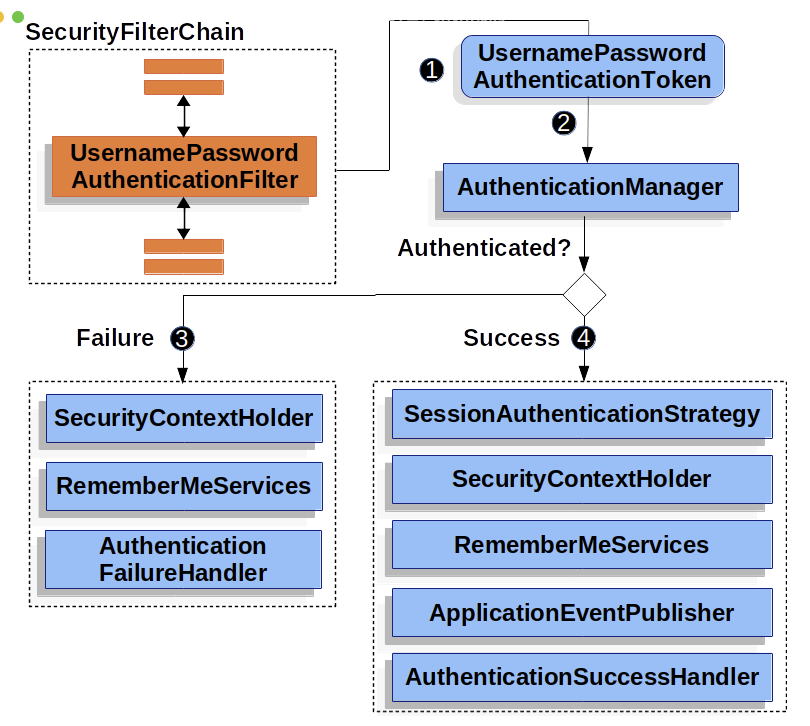
Spring Security에서의 인증 처리 과정
- (1) username과 password를 조합해서 UsernamePasswordAuthenticationToken 인스턴스를 만듭니다.
- (2) 이 토큰은 검증을 위해 AuthenticationManager의 인스턴스로 전달됩니다.
- (4) AuthenticationManager는 인증에 성공하면 Authentication 인스턴스를 리턴합니다.
- 이 Authentication 인스턴스는 SecurityContextHolder에 저장됩니다.
UsernamePasswordAuthenticationToken
- Authentication을 implements한 AbstractAuthenticationToken의 하위 클래스로 username이 Principal의 역할을 하고, password가 Credential의 역할을 합니다.
- 첫번째 생성자는 인증 전의 객체를 생성하고, 두번째 생성자는 인증이 완료된 객체를 생성해줍니다.
/**
 * An {@link org.springframework.security.core.Authentication} implementation that is
 * designed for simple presentation of a username and password.
 * <p>
 * The <code>principal</code> and <code>credentials</code> should be set with an
 * <code>Object</code> that provides the respective property via its
 * <code>Object.toString()</code> method. The simplest such <code>Object</code> to use is
 * <code>String</code>.
 *
 * @author Ben Alex
 */
public class UsernamePasswordAuthenticationToken extends AbstractAuthenticationToken {

    private static final long serialVersionUID = SpringSecurityCoreVersion.SERIAL_VERSION_UID;

    private final Object principal;

    private Object credentials;

    /**
     * This constructor can be safely used by any code that wishes to create a
     * <code>UsernamePasswordAuthenticationToken</code>, as the {@link #isAuthenticated()}
     * will return <code>false</code>.
     *
     */
    public UsernamePasswordAuthenticationToken(Object principal, Object credentials) {
        super(null);
        this.principal = principal;
        this.credentials = credentials;
        setAuthenticated(false);
    }

    /**
     * This constructor should only be used by <code>AuthenticationManager</code> or
     * <code>AuthenticationProvider</code> implementations that are satisfied with
     * producing a trusted (i.e. {@link #isAuthenticated()} = <code>true</code>)
     * authentication token.
     * @param principal
     * @param credentials
     * @param authorities
     */
    public UsernamePasswordAuthenticationToken(Object principal, Object credentials,
            Collection<? extends GrantedAuthority> authorities) {
        super(authorities);
        this.principal = principal;
        this.credentials = credentials;
        super.setAuthenticated(true); // must use super, as we override
}- 현재 우리쪽 소스 AccountAuthenticationFilter는 아래와 같습니다.
UsernamePasswordAuthenticationToken authRequest = new UsernamePasswordAuthenticationToken(username, password);
setDetails(request, authRequest);
return this.getAuthenticationManager().authenticate(authRequest);- username(Principal)과 password(Credential)을 가지고 authRequest 객체를 만들고
- setDetails은 결론적으로 UsernamePasswordAuthenticationToken의 setDetails가 동작한다.
- 즉, authRequest 객체에 request details의 내용을 넣어준다
- 그리고나서 getAuthenticationManager().authenticate(authRequest);를 통해 토큰을 검증한다.
- 인증에 성공하면 Authentication 인스턴스를 리턴하고 Authentication 인스턴스는 SecurityContextHolder에 저장
/**
 * Provided so that subclasses may configure what is put into the authentication request's details property.
 * @param request that an authentication request is being created for
 * @param authRequest the authentication request object that should have its details
 * set
 */
protected void setDetails(HttpServletRequest request, UsernamePasswordAuthenticationToken authRequest) {
    authRequest.setDetails(this.authenticationDetailsSource.buildDetails(request));
}
이제 위의 인증을 하고 SecurityContextHolder에 저장을 하기 위해 실제적으로 인증처리를 하는 친구가 바로 AuthenticationProvider이다.
AuthenticationManager(인터페이스)의 구현체인 ProviderManager가 수행한다.(보통 인증을 위임한다고 한다.)
getAuthenticationManager().authenticate(authRequest); → ProviderManager.authenticate(Authentication authentication)
/**
 * Attempts to authenticate the passed {@link Authentication} object.
 * <p>
 * The list of {@link AuthenticationProvider}s will be successively tried until an
 * <code>AuthenticationProvider</code> indicates it is capable of authenticating the
 * type of <code>Authentication</code> object passed. Authentication will then be
 * attempted with that <code>AuthenticationProvider</code>.
 * <p>
 * If more than one <code>AuthenticationProvider</code> supports the passed
 * <code>Authentication</code> object, the first one able to successfully authenticate
 * the <code>Authentication</code> object determines the <code>result</code>,
 * overriding any possible <code>AuthenticationException</code> thrown by earlier
 * supporting <code>AuthenticationProvider</code>s. On successful authentication, no
 * subsequent <code>AuthenticationProvider</code>s will be tried. If authentication
 * was not successful by any supporting <code>AuthenticationProvider</code> the last
 * thrown <code>AuthenticationException</code> will be rethrown.
 * @param authentication the authentication request object.
 * @return a fully authenticated object including credentials.
 * @throws AuthenticationException if authentication fails.
 */
@Override
public Authentication authenticate(Authentication authentication) throws AuthenticationException {
    Class<? extends Authentication> toTest = authentication.getClass();
    AuthenticationException lastException = null;
    AuthenticationException parentException = null;
    Authentication result = null;
    Authentication parentResult = null;
    int currentPosition = 0;
    int size = this.providers.size();loadUserByUsername   for (AuthenticationProvider provider : getProviders()) {
        if (!provider.supports(toTest)) {
            continue;
        }
        if (logger.isTraceEnabled()) {
            logger.trace(LogMessage.format("Authenticating request with %s (%d/%d)",
                    provider.getClass().getSimpleName(), ++currentPosition, size));
        }
        try {
            result = provider.authenticate(authentication);
            if (result != null) {
                copyDetails(authentication, result);
                break;
            }
        }
        catch (AccountStatusException | InternalAuthenticationServiceException ex) {
            prepareException(ex, authentication);
            // SEC-546: Avoid polling additional providers if auth failure is due to
            // invalid account status
            throw ex;
        }
        catch (AuthenticationException ex) {
            lastException = ex;
        }
    }
    if (result == null && this.parent != null) {
        // Allow the parent to try.
        try {
            parentResult = this.parent.authenticate(authentication);
            result = parentResult;
        }
        catch (ProviderNotFoundException ex) {
            // ignore as we will throw below if no other exception occurred prior to
            // calling parent and the parent
            // may throw ProviderNotFound even though a provider in the child already
            // handled the request
        }
        catch (AuthenticationException ex) {
            parentException = ex;
            lastException = ex;
        }
    }
    if (result != null) {
        if (this.eraseCredentialsAfterAuthentication && (result instanceof CredentialsContainer)) {
            // Authentication is complete. Remove credentials and other secret data
            // from authentication
            ((CredentialsContainer) result).eraseCredentials();
        }
        // If the parent AuthenticationManager was attempted and successful then it
        // will publish an AuthenticationSuccessEvent
        // This check prevents a duplicate AuthenticationSuccessEvent if the parent
        // AuthenticationManager already published it
        if (parentResult == null) {
            this.eventPublisher.publishAuthenticationSuccess(result);
        }

        return result;
    }

    // Parent was null, or didn't authenticate (or throw an exception).
    if (lastException == null) {
        lastException = new ProviderNotFoundException(this.messages.getMessage("ProviderManager.providerNotFound",
                new Object[] { toTest.getName() }, "No AuthenticationProvider found for {0}"));
    }
    // If the parent AuthenticationManager was attempted and failed then it will
    // publish an AbstractAuthenticationFailureEvent
    // This check prevents a duplicate AbstractAuthenticationFailureEvent if the
    // parent AuthenticationManager already published it
    if (parentException == null) {
        prepareException(lastException, authentication);
    }
    throw lastException;
}- 여러개의 Provider가 등록 될수 있다.
그런데 ProviderManager가 바로 위임받아 처리하는것은 아니고 AuthenticationProvider(interface)를 구현한 AbstractUserDetailsAuthenticationProvider 그리고 AbstractUserDetailsAuthenticationProvider를 상속한 HelloMisAuthenticationProvider에게 위임한다.
// 중요!! 아래의 두 메소드가 호출 됩니다.
// user = retrieveUser(username, (UsernamePasswordAuthenticationToken) authentication);
// additionalAuthenticationChecks()
public abstract class AbstractUserDetailsAuthenticationProvider
        implements AuthenticationProvider, InitializingBean, MessageSourceAware {

....
....
....

    @Override
    public Authentication authenticate(Authentication authentication) throws AuthenticationException {
        Assert.isInstanceOf(UsernamePasswordAuthenticationToken.class, authentication,
                () -> this.messages.getMessage("AbstractUserDetailsAuthenticationProvider.onlySupports",
                        "Only UsernamePasswordAuthenticationToken is supported"));
        String username = determineUsername(authentication);
        boolean cacheWasUsed = true;
        UserDetails user = this.userCache.getUserFromCache(username);
        if (user == null) {
            cacheWasUsed = false;
            try {
                user = retrieveUser(username, (UsernamePasswordAuthenticationToken) authentication);
            }
            catch (UsernameNotFoundException ex) {
                this.logger.debug("Failed to find user '" + username + "'");
                if (!this.hideUserNotFoundExceptions) {
                    throw ex;
                }
                throw new BadCredentialsException(this.messages
                        .getMessage("AbstractUserDetailsAuthenticationProvider.badCredentials", "Bad credentials"));
            }
            Assert.notNull(user, "retrieveUser returned null - a violation of the interface contract");
        }
        try {
            this.preAuthenticationChecks.check(user);
            additionalAuthenticationChecks(user, (UsernamePasswordAuthenticationToken) authentication);
        }
        catch (AuthenticationException ex) {
            if (!cacheWasUsed) {
                throw ex;
            }

....
....
....
실질적인 HelloMisAuthenticationProvider 등록은
- WebSecurityConfigurerAdapter를 상속해 만든 WebSecurityConfig에서 하였다.
- 아래와 같이 HelloMisAuthenticationProvider를 등록 하였고 이 provider를 통해 실제 인증에 대한 부분을 처리 한다.
- 인증 전의 Authentication 객체를 받아서 인증이 완료된 객체를 반환하는 역할을 합니다.
@Configuration
@EnableWebSecurity
@RequiredArgsConstructor
public class WebSecurityConfig extends WebSecurityConfigurerAdapter {

    private final AccountUserDetailsService userDetailsService;

    private final HelloMisService helloMisService;

    @Override
    protected void configure(AuthenticationManagerBuilder auth) throws Exception {
        auth.authenticationProvider(authenticationProvider());
    }

  @Bean
    public AuthenticationProvider authenticationProvider() {
    return new HelloMisAuthenticationProvider(helloMisService, userDetailsService);
}- 다시 돌아와 AbstractUserDetailsAuthenticationProvider를 상속한 HelloMisAuthenticationProvider가 인증에 대한 위임을 받았고 실질적인 처리를 합니다.
즉, 위에서 중요하다고 말했던 메소드들이 위임을 받아 인증 수행을 합니다.
1. HelloMisAuthenticationProvider.retrieveUser()
2. HelloMisAuthenticationProvider.additionalAuthenticationChecks()
public class HelloMisAuthenticationProvider extends AbstractUserDetailsAuthenticationProvider {
...
...
...
protected void additionalAuthenticationChecks(UserDetails userDetails,
                                                  UsernamePasswordAuthenticationToken authentication) throws AuthenticationException {

        String username = (String) authentication.getPrincipal();
        String password = (String) authentication.getCredentials();

        log.debug("Request authentication check, username:{}, password:{}", username, password);

        try {
            HelloMisEntity entity = helloMisService.authorize(username, password)
                    .block(Duration.ofSeconds(10));
            if (entity == null || entity.result() == null) {
                throw new BadCredentialsException("Hello MIS 서비스에서 정보를 가져오는데 실패 하였습니다.");
            }

            if (!entity.result().code().equals("SUCCESS") ||
                    !entity.result().authCode().equals("AUTH_SUCCESS")) {
                throw new BadCredentialsException("인증에 실패하였습니다 code:" +
                        entity.result().code() + ", auth code: " + entity.result().authCode());
            }
        } catch (Exception e) {
            log.error("Fail to authorize username:{}, Exception:{}", username, e.getMessage());
            throw new BadCredentialsException("인증에 실패하였습니다");
        }
    }

@Override
protected UserDetails retrieveUser(String username, UsernamePasswordAuthenticationToken authentication) throws AuthenticationException       {
        return userDetailsService.loadUserByUsername(username);
    }

...
...
1번의 경우
- 참고
- UserDetails : 인증에 성공하면 UserDetails는 Authentication을 SecurityContextHolder에 저장하기 위한 객체로 만들기 위해 사용 됩니다.
- UserDetailService : User 정보를 전달하는 인터페이스
- return new User(username, "", Collections.emptyList());
@Slf4j
@Service
@RequiredArgsConstructor
public class  implements UserDetailsService {

    private final HelloMisService helloMisService;

    @Override
    public UserDetails loadUserByUsername(String username) throws UsernameNotFoundException {
        log.debug("Request load user:{}", username);
        try {
            HelloMisEntity.Member member = helloMisService.findMemberById(username)
                    .checkpoint("Get user info from hello-mis")
                    .block();
            if (member == null) {
                throw new UsernameNotFoundException("Can't find username (" + username + ") from hello-mis");
            }
            return new User(username, "", Collections.emptyList());
        } catch (Exception e) {
            log.error("Fail to load user:{}, Exception:{}", username, e.getMessage());
            throw new UsernameNotFoundException("Can't find username (" + username + ") from hello-mis");
        }
    }
}
2번의 경우
- helloMisService.authorize(username, password) 메소드에서 HelloMIS 로그인 처리를 하는 service를 호출하여 실질적인 인증을 합니다.
AuthenticationManager
- 인증에 대한 부분은 AuthenticationManager를 통해서 처리하게 되는데, 실질적으로는 AuthenticationManager에 등록된 AuthenticationProvider에 의해 처리됩니다.
- 인증이 성공하면 isAuthenticated=true 인 객체를 생성하여 SecurityContext에 저장합니다.
- 실패할 경우에는 AuthenticationException을 발생시킵니다.
결과적으로 위의 흐름은 아래의 Spring Security 인증 아키텍처와 동일하다.


인증 테스트
- 권한코드 발급
현재 scope를 지정했기 때문에 승인하는 페이지가 뜹니다. 인증 해줍니다.

아래처럼 code뒤에 권한코드를 받습니다.(원래는 클라이언트가 받아서 전달 합니다.)

2. 액세스토큰, 리프레쉬토큰 발급
포스트맨에서 작업기준 아래와 같이 Basic Auth에 Client id와 Secret을 넣어줍니다.

헤더에는 Content-Type를 추가해줍니다.

그리고나서 발급한 권한코드를 넣어줍니다.

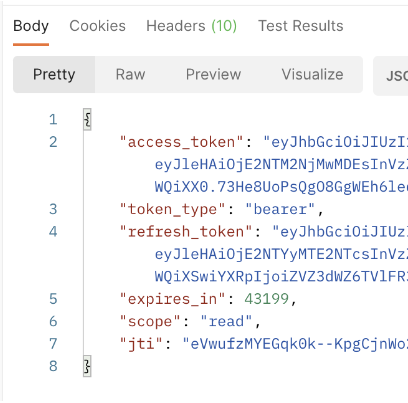
아래와 같이 토큰들이 발급 됩니다.

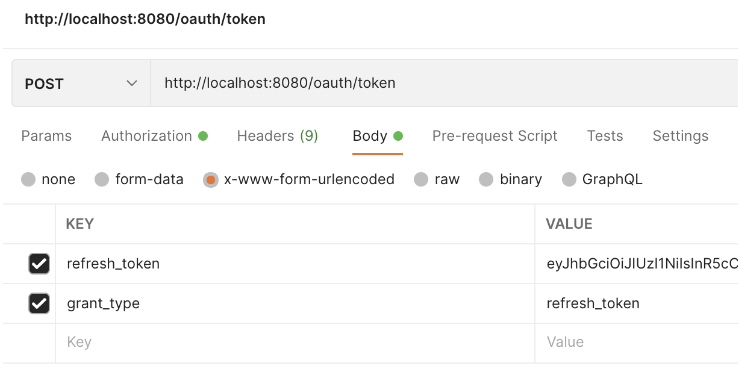
3. 리프레쉬 토큰 발급
위에서 발급된 리프레쉬 토큰을 넣어줍니다.
아래와 같이 access_token이 재발급 됩니다.
'OpenSource > Spring Security' 카테고리의 다른 글
| SpringSecurity OAuth2.0 사용(feat. No Authroization Server Support) (0) | 2024.07.05 |
|---|---|
| 스프링시큐리티 시작하기 - XML을 통한 인증 예제(분석하기!) (0) | 2014.03.05 |
| 스프링시큐리티 시작하기 - XML을 통한 인증 예제(묻지마 따라하기!) (0) | 2014.01.14 |
| 스프링시큐리티 - Filter Chain (0) | 2013.08.17 |
| 스프링시큐리티 - DelegatingFilterProxy (0) | 2013.08.12 |


